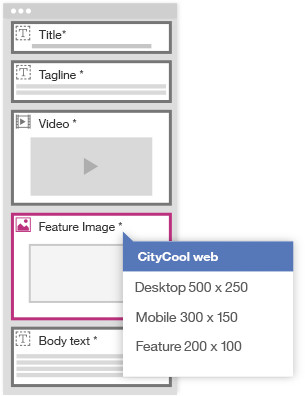
A single image can be used in many ways. You can use it as a hero image on a landing page, a featured image in a blog, or a product image in a store catalog. You might also use it in an email campaign or a social media post. You also need the same images to display on desktops, tablets, and smartphones. Because there are so many reasons to reuse images, you need a way to optimize your images.
Image profiles create and store image renditions so you can reuse the same source image. You can predefine sets of dimensions for all the ways you can use an image as renditions.
Imagine a scenario where your content composers regularly launch new product lines. They need to display a product image in different media. You do not need to upload different images or edit the source image for each media type. Instead, you can create an image profile and associated renditions as follows:
Create an image profile
- Go to the Developer > Image profiles page.
- Click Create image profile.
- Provide a name and description that is meaningful and unique so you can find it, for example, Media types.
Note: Only users with the administrator or manager role can create image profiles.
Add your renditions
- Click Add rendition.
- Enter a meaningful rendition label and the dimensions.
- The label name you provide auto-populates as the rendition key. The key is used by developers to access the renditions.
Tip: You can add a key that is different from the label. The key must be unique and cannot start with a number.
- Keep adding renditions for all the different media types. For example, you might create the following rendition definitions in an image profile:
Label
Key
Width
Height
Desktop
desktop
1600
450
Tablet
tablet
1024
400
Smartphone
smartphone
768
280
Add the image profiles to a content-type
When you add an image element, you can select which image profile to associate with that element.
- From the Developer > Content types page, click Create content type. Then, add a name, for example, New product.
- From the Design tab, drag and drop an image element.
- Then, from the Basic tab for the image element, click the drop-down menu for the Image profiles field.
- The image profile you created Media types will be available as an option on the list.
- Select the Media types image profile and click Apply.
Figure 1. Image profile applied to an image element in a content type

Apply the image profile
When content composers create their new product line content:
- They select the Content-type New product.
- Add an image to the image element in the content form.
- The uploaded image displays in the Desktop, Tablet, Smartphone renditions. Content applies the selected image profile and the dimensions specified to create renditions.
Note: Uploaded images cannot be smaller than the dimensions defined in the rendition. Also, you can only use JPG/JPEG, PNG, and GIF file types with image profiles.
Edit image profiles
If you edit the image profiles, the changes apply to all the images using the image profile. For example, if you change the dimensions or add new renditions, they are applied to the draft images.
Note: Changing the rendition label does not change the key. If you change the key-value, it breaks the image renditions in the content items.
Tip: Before you edit, verify where you have applied the image profile from the References tab.
Create a copy of the image profile
You can create a copy of the saved image profile and save it with a different name. This copy comes in handy when you want to build on the available renditions for a different use case.
Note: When you edit image profiles and click copy before saving the edits, the copy will include the edits.
Delete image profiles
You cannot delete image profiles applied to content items. You can delete individual renditions within the image profile. Deleting the rendition dimensions will not affect published content items.