Create a mobile message
- Go to Mobile > Message drafts and click New draft.
- Select the app group, which is a group of iOS and/or Android apps registered with the mobile app service and pre-configured in the system. If you select an app group that contains both iOS and Android services, you will see both content areas in Enter Message Content.
- In Contact Summary, view the contact source. By default, it is initialized with the mobile-enabled database.
- (Optional) In A/B Testing, toggle On if you want to test multiple mobile app messages with a small group of contacts.
- Choose the message type:
- Simple
- In-app
- Inbox
- Data only
- In the Delivery name field, give the mobile app message a unique name.
- In the Location field, select the location where you would like to save your message: a private folder (visible only to you) or organization's shared folder. If you want to publish the message to Programs or use it in an API call, choose a shared folder.
- In the Campaign name field, give a meaningful campaign name so you can easily identify it.
- Enter device content. The content shown on the device is different for each message type. Detailed instructions for iOS and Android platforms are described in the sections below.
- Configure the delivery option settings on the Add settings page:
- Tagging: Select tags from the list to help categorize and locate messages. You can also run reports by tag name.
Note: Describe the mobile app message delivery. Only users in your organization who have access to this draft can see them.
- Certify Send: Enable the toggle to certify the notification. Once the certify toggle is enabled, you can set the duration for the delivery of this notification to be certified. You can set a time limit of up to 336 hours(2 weeks in hours). When you enable Certify Send settings for notifications, if the notifications are dropped or fail to deliver through the traditional providers, the notifications are then delivered and displayed as simple notifications. Certify send requires SDK versions 3.8.2 and above. For more information, see Send certified push notifications.
Note: Enabling the certify send feature will increase your Campaign billing. Contact Support to enable the certify send feature.
- Throttling: Enter the maximum number of messages (minimum 1,000), rounded to the nearest thousandth, that you would like to send per hour. The system will round the entered number to the nearest thousand. The one hour send period begins when you click Send Now or at the scheduled send time.
Note: Throttling does not work with the Use Recipient Timezone setting.
- Tagging: Select tags from the list to help categorize and locate messages. You can also run reports by tag name.
- On the Schedule this message page, choose Set message expiration date. The setting will show if the mobile app developer added it to the template. Choose when you want the message to expire:
- Default expiration: expires 30 days after the message is sent.
- Fixed period from send time: expires after a specified number of days or hours.
- Fixed date: expires on a specified date. The maximum setting is 1 year.
- Schedule the message to send immediately or at a later date or publish the message to make the message available for programs and API calls.
- You can send the message now and if available, configure Set inbox message expiration date to determine when the message will expire.
-
Determine when you want to process the contact source and schedule the message to send using a recipient's time zone or an alternate one. If the scheduled time passed in the alternate or recipient time zone, the message is sent immediately.
- Click Publish to use your mobile message in a Program or to use it for APIs. If available, select when you want the message to expire. The Contact Source of the Program or API call is used. The Schedule type defaults to Publish.
Note: Click Calculate to see a count of recipients and time zones included in your contact source and app group. You can also View Details to see the location of your recipients in their respective time zones on an interactive map.
After the message is sent or scheduled successfully, you can click the Scheduled message link below the confirmation to see any scheduled and sent messages on the Mobile messages and templates page.
Push notifications content for Android devices
On the Enter Android Content page, add the message content as follows:
- Title: The title shows as the first line in the push notification. You can use personalization.
- Notification message: Type the message to your contacts. You can use personalization.
- Message characteristics (enable if available in the draft):
- High priority: The content appears on the user's notification screen.
- Sensitive: The content does not show on the user's notification screen.
- Large icon URL: The image must be hosted on an external site.
- Add action: Select one to four actions that mobile users can perform in the message:
- Open app: Opens the application. Only one open app action is allowed.
- Open URL: Opens a URL that you provide.
- Call: Dials a phone number that you provide.
- Custom actions: Allows the mobile app developer to edit a JSON sample and create a custom action that can be used by creation users.
Note: If an action is a string type, such as a URL, you can add personalization to that field.
- Expansion options: If you add additional text or image, you do not have to add another action.
- No expansion: Sends a basic notification that includes only one action.
- Additional text: Add more information to the notification.
- Additional image: Enter the URL for the image.
- Add extensions: Add a pre-configured extension that updates or shows data on an extended device, such as an activity tracker or watch.
- You can create any number of extensions within the payload limit.
- If you exceed the maximum payload limit (4 KB for Android content), an error message shows on the Confirm and Send page and the message is not sent.
Push notifications content for iOS devices
On the Enter iOS Content page, add content as follows:
- Title: The title shows as the first line in the push notification.
- Subtitle: This is the second line in the message.
- Notification message: Enter the message that your mobile app users will see.
- Interrupt level: Starting with iOS 15, you can set the interruption level for notifications. This setting determines the priority and timing of when the user receives the notification. Interrupt level setting is available only when you create an iOS draft and select Simple as the Mobile App Message Type. The following levels are available for you to select:
- Passive: Notifications are delivered specifically to the notification center and do not interrupt the user. This level is available starting with the iOS 15 version.
- Active: Behave as a traditional push notification that wakes the phone but does not interrupt focus modes set by the user. This level was the standard notification level for messages before the iOS 15 version.
- Time-sensitive: Traditional push notifications that will interrupt the focus mode settings. This level is available starting with the iOS 15 version.
- Critical: Notifications will only be sent as critical if you have already received permission from Apple to do so; otherwise, the notifications are sent as time-sensitive. This level of notification was available before the iOS 15 version.
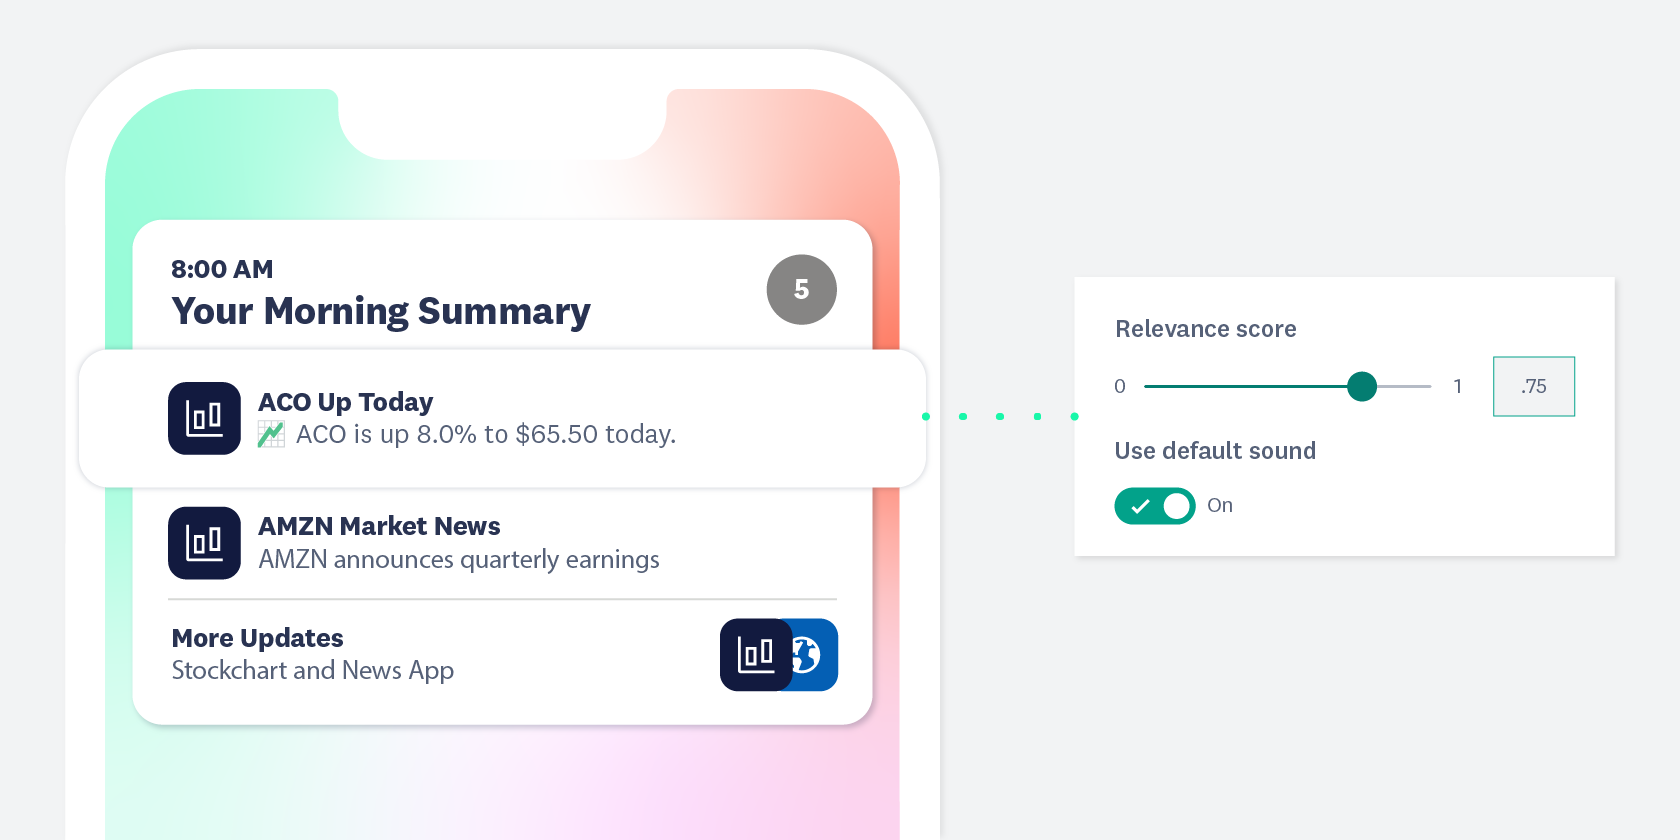
- Relevance score: This setting determines the priority order for your applications’ notifications. When the notifications in your app are grouped, the relevance score you set for a notification determines the sorting order for that notification. You can set a score between 0 and 1. The notification with the highest score gets featured first within the notification summary for iOS 15, followed by the other notifications in your app based on their score, respectively. The relevance score setting is available only when you create an iOS draft and select Simple or Simple + Inbox as the Mobile App Message Type.
- Add Action: Select one to four actions that mobile users can perform in the message.
- Open app: Only one Open App action is allowed.
-
- Open URL: More than one URL is allowed.
- Call: Dials a phone number. More than one Call action is allowed.
- Custom actions: Allows the Mobile App Developer to edit a JSON sample to create a custom action.
- Action categories: Click Add category to add a grouped set of actions defined by the Mobile App Developer. Only one action category is allowed.
Note: If an action is a string type, such as a URL, you can add personalization to that field. Click the personalization icon and then select a database field.
Enable the following options if they are available in the draft:
- Use default sound: the default sound is in the iOS device. If you choose no and want to add your own sound file, enter the sound file name that is included in the bundle in your app.
- Set badge: By default, this value is turned off. Select 'Yes' to indicate to your contacts the number of new push notifications that are available. If you select 'Yes', you can enter a new number to overwrite the value set in the iOS app.
- Media URL: Add a valid URL from a hosted site and preview an image, audio, or video. Media URL uses 3D touch technology that allows mobile app users to preview an image, audio, or video. For a list of media content associated with a notification, see Apple's UNNotificationAttachment API reference.
- Add extensions: Adds an extension template, preconfigured by your mobile app developer, that updates or displays data on an extended device, such as an Apple watch.
- You can create any number of extensions within the payload limit.
- If the maximum payload limit is exceeded (4 KB for iOS content), an error message shows on the Confirm and Send page and the message is not sent.
Note: The values in the iOS Content are defined by the iOS payload that is supported in the Apple Notification Server (ANS).
In-app message templates
Top and bottom banner templates
Create a message that is displayed in the app as a top or bottom banner when the specified rules are met:
- Main image URL: Type the URL of the page that hosts the image.
- Title: The title shows as the first line in the message.
- Message: Type the text that will show in the app.
- Color: Enter the hex value of the text.
- Max views: Choose the maximum number of times the mobile app user will see this in-app message.
Image and video templates
Create an image message that is displayed in the app when the specified rules are met:
- Max views: Choose the maximum number of times the mobile app user will see this in-app message.
- Title: The title shows as the first line in the message.
- Expandable text message: Create a message that will display under the Title in the in-app message.
- Media URL: Enter a video stream or image URL that will appear in the in-app message. The image URL can be the following formats; GIF, PNG, or JPEG.
- Action URL: Enter an action URL for the image in the in-app message; then the user clicks on the image or video, they will be directed to the URL in this field.
Inbox templates
Inbox templates are configured by your mobile app developer and may include video and image templates and/or optional HTML content blocks. You'll need to set up the message separately for each device.
Note: If only one inbox template exists, the system will automatically show it. If more than one template is available, click Change and select an alternate template.
Traditional inbox template
Create an HTML message that can be accessed from the inbox within the app. This template includes a short preview of the inbox.
- Title: The title shows as the first line in the message.
- Inbox preview: Type the text that will show in the app's inbox.
- Select content: Click to select an HTML content block that includes your message and image.
Image and video templates
Add an image to your inbox message to create a better UI experience.
- Main image URL or video URL: This image displays at the top left corner of the inbox message.
- Title: The title shows as the first line in the message.
- Subtitle: The subtitle displays under the title in the inbox message.
- Additional image URL or Main image URL for video: This image displays in the inbox message.
- Notification message: This notification message appears in the inbox message.
- Left action
- Displayed action label: Enter the label for the action on the left side of the inbox message.
- Enter the left action URL: Enter the URL for the action on the left side of the inbox message.
- Right action
- Displayed action label: Enter the label for the action on the right side of the inbox message.
- Enter the right action phone number: Enter the phone number for the action on the right side of the inbox message.
- Center action
- Displayed action label: Enter the label for the action in the center of the inbox message.
- Enter the center action URL: Enter the URL for the action in the center of the inbox message.
Data only notification template
- Title: The title shows as the first line in the message. You can add personalization, such as the mobile app user's first name, using available database fields.
- Body: Type the text that will show in the app.
- Latitude and longitude: Enter the GPS coordinates to identify a location.
- Add template: If additional templates are available, you can add another template.
Emojis in mobile messages
You can use emojis in all types of OS and Android mobile app messages. Emojis can also be used in API calls.
To add an emoji to your message, copy and paste the emoji into any field.
Do not type the emoji symbol, such as :-). You must copy and paste the emoji into the field. The field includes the emoji in the estimated character count.
Pro tip: The character limit for iOS is 178 characters. Four lines of text before the text is cut off. The character limit for Android is 65 for the title and 240 for the description.