To create a content personalization rule on your channel, complete the following actions:
- Go to Personalization > Zones.
- Select the channel for which you want to create the rule.
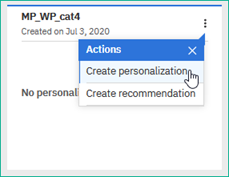
- For the zone you want to create content personalization, click Actions > Create personalization.
- In the Content personalization pane, click New rule.

- In the Select personalization type pop up, click Rule-based personalization, and then click Next.

- In the Rule name field, enter a unique rule name for the rule.
Note: A rule name can only contain alphanumeric characters and it cannot be more than 100 characters. Rule name should not have these characters: ~ ` ! @ # $ % ^ & * ( )+ = < > , . \ / | { } [ ]
Also, it must be unique across all the channels within the organization. - In the Control group field, enter control group percentage.
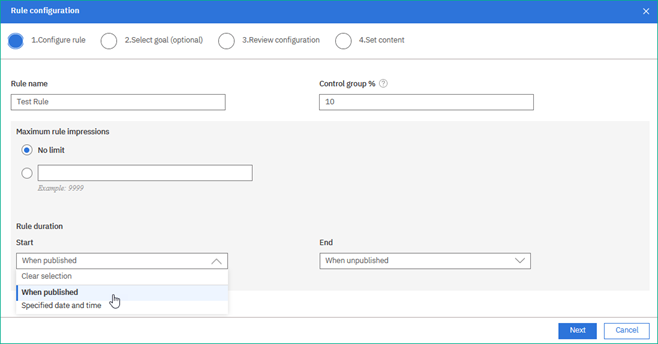
- The No limit radio button is selected by default for the field Maximum rule impressions. You can select the other radio button if you want to set a value for Maximum rule impressions. You can then enter the value in the input box.
- Select the Rule duration.
- Do one of the following actions:
- From the Start list, when you select value, such as “When published” the rule is scheduled to start as soon as you publish the rule.
- From the Start list, when you select value, such as “Specified date and time”, you can select a start date by specifying the specific date and time in the calendar.
- Do one of the following actions:
- From the End list, when you select value, such as “When unpublished” the rule is scheduled to end immediately after you unpublish the rule.
- Similarly, from the End list, when you select value, such as “Specified date and time”, you can select an end date by specifying the specific date and time in the calendar.
- Click Next. The Select goals page opens. This is an optional step, if you want to create personalization with a goal. Else, you can click Next to proceed.
- Review the rule configuration details, and click Next.
- Select the content to be shown for personalization. Do one of the following actions:

- If the content management system registered with Acoustic Personalization is Acoustic Content, complete the following steps:
Click Select content The Acoustic Content Palette pop-up window displays. Browse the content from the Acoustic Content window. Use the Search bar to find the content type (video, image, text, xml) that you are looking for in the palette. Provide a name to identify the content to be used for personalization. The Content location field displays the path of the selected content in Acoustic Content. - If the content management system registered with Acoustic Personalization is Acoustic Content, complete the steps if you want to specify HTML blob:
Enter the content in the form of HTML blob in Content. Provide a name to identify the HTML content to be used for personalization. - If the content management system registered with Acoustic Personalization is Other, complete the following steps:
Enter the content in the form of URL or HTML blob in Content . Select either HTML snippet or URL from the Content type field according to the content entered in the Step (a). Provide a name to identify the content to be used for personalization.
Note: When you select the HTML snippet option, ensure that the content source is provided in the form of a valid HTML tag, such as <img> tag along with the source attribute. When you select the URL option, ensure that the content source is provided in the form of a valid URL.
- If the content management system registered with Acoustic Personalization is Acoustic Content, complete the following steps:
- Click Create rule.
- Do any one of the following:
- To select an existing segment, complete the following steps:
- In the Segment pane, click Select segment.
- Select segment pop-up is opened which lists all the segments from the Segment library.
- You can search a segment from the left pane. The selected segment (Inclusion and exclusion conditions) is shown on the right pane.
Tip: You can create complex segment conditions by using multiple AND or OR operators to form a nested hierarchy.
- To select an existing segment, complete the following steps:
- To select the segment, click Select.
- To create a new segment, complete the following steps:
- Click New segment. In the Create segment screen, provide the required details and click Next. For more information about adding segment conditions, see Create Segments
- To save and select the segment, click Save and select.
- The segment conditions that you selected are displayed in the Segment
- Do one of the following actions:
- To save the rule, click Save. The rule is saved as draft and is available in the Rule editor
- To publish the rule, click Save and publish. The rule is published and is displayed in the Published rules.
Note: The rule will be published but will not run or be applied until the start date.
Create a draft rule
You can edit the published rule by creating a draft copy of the rule and update the data like the rule name, content, duration, and segment to which the personalization is targeted.
To create a draft rule, complete the following actions:
- Log in to Acoustic Personalization.
- In the menu, go to Acoustic Personalization and click Zones.
- Select the zone for which you want to update the rule, and click Actions > View details.
- To view the published rules, click Published rules.
- Click action menu of the rule that you want update, and then click Create draft. The Rule details pane opens. A text string _draft is displayed next to the Rule name
- You can do the following actions:
- In the Rule configuration, click Edit. Type the rule name, control group percentage. Select the primary goal, and the rule duration start date and end date. To save your changes, click Save.
- To update the content, select the content using the Content
- To edit the segment details, go to Segment pane, click Change segment.
- Click Save. The rule is updated and is saved as draft.
Edit a rule
You can edit an existing rule by updating the rule details, content, and segment to which the personalization is targeted. To update an existing rule, complete the following actions:
- Log in to Acoustic Personalization and click Zones.
- Select the zone for which you want to update the rule, and click . The Content personalization pane shows list of all the rules for a zone.
- Click Rule editor to see all the draft rules.
- Click action menu of the rule that you want update, and then click Edit.
- You can do the following actions:
- In the Rule configuration, click Edit.Type the rule name, control group percentage. You can update the primary goal, and the rule duration start date, start time, end date, or end time. To save your changes, click Save.
- To update the content, select the content by using the Content pane.
- To edit the segment details, go to Segment pane, click Change segment.
Note: You can edit a segment only if it is not being used in any of the rules.
For more information, see Create a segment
- Click Save.The rule is updated and is saved as draft.
Delete a rule
After you create rules, you might want to delete the rules if they are not created correctly or they are no longer valid. To delete a rule, perform the following actions:
- Zones.
- On the Zones page, select the zone and click
- The Content personalization pane shows list of all the rules for a zone.
- Click Rule editor to see all the draft rules.
- Click action menu of the draft or new rule that you want to delete. Click . A confirmation window opens.
- To permanently delete the rule, click Yes.
Your rule is permanently deleted.
When can you delete a rule?
- You can delete a newly created rule, which is not published yet.
- You can delete the draft copy of the published rule that you created by using Create draft.
When you cannot delete a rule?
- You cannot delete an active or published rule as there might be metrics such as count of personalization associated with that rule, and deleting this rule might cause an impact on auditing and reporting in Acoustic Personalization.
- You cannot delete a rule, which is in the unpublished state, if it was previously published.
Reorder the rules
When you apply personalization, the rules are evaluated in the same sequence as they are listed on the screen. You can change the order of rules that best suits your personalization needs.
You can rearrange the sequence of your rules by using Reorder option on the zone details.
- Go to Zones.
- Select the zone and click . The Content personalization pane shows a list of all the rules for that zone.
- Click Published rules.
- Click Reorder. Reorder rules screen is displayed, which shows the published rules for that zone, in their current sequence.
- You can preview a rule by clicking preview icon. Pop-up window opens and displays the rule details and the segment.
- Drag and drop a rule to its desired location. You can repeat this action until you get the desired sequence of the rules.
- Click Apply.
- Verify that the change in the sequence is reflected on the Zone details page.
Example: You can create the rules based on the following conditions:
- Rule 1: Visitor who adds item to cart the product with the name Sleekfit 3.0.
- Rule 2: Visitor who views the product with product name that contains word Sleekfit.
According to this sequence, the rule is first applied to set of visitors who add Sleekfit 3.0 product to cart. If this condition is not met, then only the second rule "Visitor who views the product with product name that contains word Sleekfit" is evaluated.
Hence, the sequence of the rules in which they appear is important.
Preview your personalized content
Content Personalization provides a preview capability that allows marketers to verify how the content of the rule looks as expected before going live on the website.
To preview personalized content:
- Ensure you are on the zone details page. The Content personalization pane shows list of all the rules for a zone. Click Rule editor to see all the draft rules.
- Click action menu of the draft rule for which you want to preview the personalized content. Click A new window opens which shows the personalized content.
After you review the rule content and are satisfied with how the draft rule is displayed on the website, you can publish that rule. You can also preview the content of a published rule by clicking Published rules from the Content personalization pane.
Note You can preview draft and published rules, but not the archived rules. There can be a short delay before your preview appears.
Publish a rule
To activate a rule on your channel so that it is used for personalization, you must publish the draft rule.
An unpublished rule (that is, a rule that is in the Draft state) is not active on the channel and is not evaluated for personalization.
Important: When you save and publish a new rule, the personalized content as per the successful evaluation of the new rule will be displayed on the channel one hour after the visitor had first opened the channel web page.
During this one-hour interval, the Personalization Library collects and holds the visitor behavior and events data information in the cache so that the newly created rule takes into account the latest visitor information.
For example, if a visitor visited the web page at 3:00 PM and you publish a new rule at 3:15 PM, then the personalization based on the successful evaluation of the rule will display on the channel at 4:00 PM, that is one hour after the visitor’s first visit.
For more details, see Caching in Personalization Library.
To publish a rule, complete the following actions:
- Log in to Acoustic Personalization.
- In the menu, go to Acoustic Personalization and click Zones.
- Select the zone and click . The Content personalization pane shows a list of all the rules for that zone.
- To view the draft rules, click Rule editor.
- Click the action menu of the rule that is to be published and then click Publish.
After you publish the draft rule, it becomes active and is used for personalizing the selected zone.
Unpublish a rule
You must unpublish a rule to stop the rule from being applied to the zone. An unpublished rule is maintained as a draft copy in the Rule editor.
To unpublish a rule, complete the following actions:
- Log in to Acoustic Personalization.
- In the menu, go to Acoustic Personalization and click Zones.
- Select the zone and click > View details.
- Click Published rules.
- Click the action menu of the rule that is to be unpublished, and then click Unpublish.
The rule is now inactive for that zone, and will not be used for personalization.
Even though you unpublish the rule, it is still available in the Inactive state in the Rule editor. You can update the rule, or activate it later by publishing the rule.
Archive a rule
You can move old rules that are not required for personalization to the Archived rules list. You can use the archived rules for personalization in future.
- Log in to Acoustic Personalization.
- In the menu, go to Acoustic Personalization and click Zones.
- Select the zone and click Actions > View details.
- Click Published rules to view all the published rules.
- Click action menu of the rule that you want to archive. Click Actions > Archive. A confirmation window opens. (Optional) Type a justification and click Archive. Your rule is archived successfully.
- Click the list view icon to view all your archived rules.
Note: You can archive all the rules except published rule that has a draft copy.
View archived rules
You can view all the archived rules in Acoustic Personalization.
- Log in to Acoustic Personalization.
- In the menu, go to Acoustic Personalization and click Zones.
- On the Zones page, select the zone and click Actions > View details.
- Click the archive icon to view the archived rules.
You can select the Last week option from the list to display the archived rules for the last one week. Similarly, you can select any other option such as "Last month", "Last year", "Last two years", "All archived rules" to filter and display data for that duration you choose.
Unarchive a rule
You can unarchive the rule that you archived in the past so that it can be used for personalization.
- Log in to Acoustic Personalization.
- In the menu, go to Acoustic Personalization and click Zones.
- Select the zone and click Actions > View details.
- Click the list view icon to view the archived rules.
- Select the check box for the rule you want to unarchive. Under Actions, click the archive icon. A confirmation window opens. Click Unarchive. Your rule is unarchived successfully.
- To view your rule, click Rule editor.
After you unarchive the rule, it becomes inactive. You can publish it later to use it for personalizing the zone.
View the rule status
You can view the status of your rules and understand the various stages that the rule goes through while you personalize your channel that uses Acoustic Personalization.
- Go the Zones page, select the channel.
- Click next to the zone for which you want to view all the rules.
- The Published rules tab lists all the published rules in the zone and the Rule editor tab lists all the draft rules that are created in the zone.
The status of the rule is displayed below the rule name.
Status of a Content personalization rule
Your rule can be in any of the following states:
- Inactive - Scheduled: Rule is created and scheduled to run during the specified date range but it is not published or active on the channel yet.
- Inactive - Expired: Rule is created, but is expired that is, the rule's end date is passed today's date.
- Active - Scheduled: Rule is published and is scheduled to run during the specified date range.
- Active - In progress: Rule is published and is running on the channel and can be evaluated for personalization.
- Active - Completed: Rule is published and its schedule is completed.
- Inactive - Completed: Schedule of the rule is completed, but the rule is not published.
Status of A/B test
If you created an A/B test, it can have some additional statuses. For information about A/B Test statuses, see A/B test status
Troubleshooting
- Next and Save buttons are missing when creating a new rule.
When creating a new rule, the Next and Save buttons are not displayed in the Rule Configuration window.
Cause: This issue might occur if you are using a web browser or a web browser version that is not supported by Acoustic Personalization.
Resolution: Verify that the web browser you are using is supported by Acoustic Personalization. For information about supported web browsers and other system requirements, see System requirements for Acoustic Personalization
- Rule is not created.
Cause: Information is not provided for all the fields.
Resolution: Provide the necessary inputs for all the fields required to create a rule.
Also see...
Here are some of the next steps or related topics you can browse through.
Create content personalization with a goal